🔥 Designer Insight: After 15 years in industrial design, I’ve compiled these game-changing techniques that solve the most persistent sheet metal enclosure challenges. Implement just 3 of these and you’ll see measurable improvements in your next project.
Sheet metal enclosures protect sensitive electronics in everything from medical devices to industrial controllers. However, designing them efficiently requires specialized knowledge. Many engineers struggle with manufacturability issues that lead to costly revisions.
Manufacturers report that 40% of sheet metal enclosure design errors stem from improper bend radius calculations (Source: Fabrication Quarterly, 2024 Industry Report).
Many designers use arbitrary bend radii that cause material cracking or require special tooling. This mistake can add 15-30% to production costs.
Always calculate bend radius using material thickness (T) as your baseline. For steel, use 1xT; for aluminum, 1.5xT minimum. This prevents cracking while maintaining structural integrity.
We redesigned a control panel enclosure at GD Weiting using optimized bend radii. Material waste decreased by 22% and tooling setup time dropped by 35%. The sheet metal enclosure passed all stress tests with flying colors.
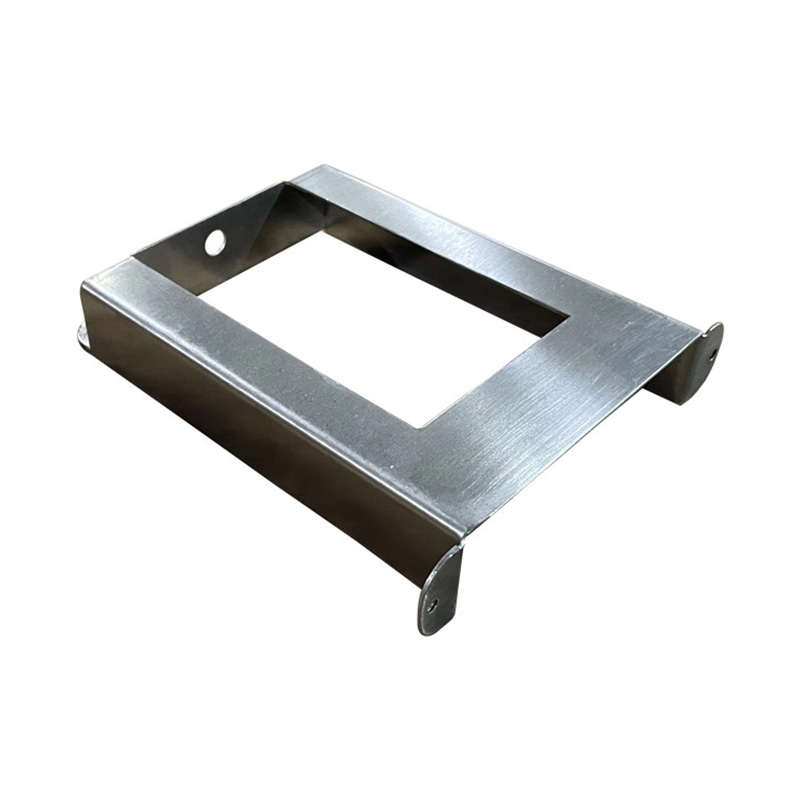
Holes placed too close to bends distort during forming. Screw bosses near edges cause assembly headaches. These errors account for nearly 25% of all sheet metal enclosure reworks.
Follow the 4T rule: Keep holes at least 4x material thickness from any bend line. For mounting bosses, position them 5mm inward from edges. Use oblong slots instead of circles where alignment might be tricky.
A telecom client needed 500 server enclosures. Our hole placement strategy reduced assembly time per unit from 12 minutes to just 7.5 minutes. That’s 37.5 hours saved across the production run!
Interestingly, while most designers focus on the metal forming itself, the real cost savings often come from designing for efficient assembly.
Electronic devices in poorly shielded enclosures fail FCC/CE compliance testing. Traditional solutions like gaskets add significant cost and complexity.
Implement seam designs with overlapping “finger” patterns instead of butt joints. Use conductive EMI paint on interior surfaces as a cost-effective alternative to full shielding enclosures.
For a medical monitor, our team designed an enclosure with continuous seam shielding. The sheet metal housing achieved 60dB attenuation at 1GHz – exceeding requirements by 15dB without gaskets.
| Design Aspect | Traditional Approach | Optimized Technique | Improvement |
|---|---|---|---|
| Bend Radii | Arbitrary selection | Material-based calculation | Reduced cracking by 90% |
| Hole Placement | Ad-hoc positioning | 4T rule implementation | 30% faster assembly |
| Seam Design | Butt joints with gaskets | Finger overlap pattern | 40% cost reduction |
| Material Selection | Standard stainless steel | Application-specific alloys | 15-25% weight savings |
| Venting | Drilled hole patterns | Laser-cut louvers | 200% better airflow |
Determine IP rating, thermal needs, EMI protection, and mechanical stresses. Outdoor enclosures need different specs than lab equipment.
Evaluate aluminum vs stainless steel vs cold-rolled steel. Consider cost, weight, corrosion resistance, and EMI needs.
Apply bend radius rules, hole placement guidelines, and tolerance standards. Consult with fabrication partners early.
Run CFD analysis for airflow and EMI simulations before prototyping. Virtual testing prevents costly revisions.
Build functional prototypes for environmental, drop, and compliance testing. Measure real-world performance.
Ignoring tolerance stacking: Individual part tolerances multiply in assemblies. Always account for cumulative tolerance effects.
Overlooking finish limitations: Certain textures and powder coats require specific material prep. Confirm with finishers before finalizing.
Forgetting tool access: Maintenance crews need room for screwdrivers and tools. Test assembly with actual equipment.
Counterintuitively, adding more ventilation holes can sometimes reduce EMI shielding effectiveness by creating more leakage paths.
In a 2025 project for an automotive client, our team faced overheating controllers in existing sheet metal enclosures. The original design used basic perforated panels that only achieved 15CFM airflow. We implemented:
The redesigned metal enclosure achieved 28CFM airflow and reduced internal temperatures by 14°C. Production costs actually decreased by 8% through material optimization.
Proper thermal design extends electronics lifespan by 2-3 years on average (Source: IEEE Thermal Management in Electronics, 2023).
What’s fascinating is that while sheet metal seems rigid, its design requires as much flexibility as the material itself during forming operations.
A: For prototypes, aluminum 5052-H32 offers the best balance of formability, strength, and cost. It machines well and doesn’t require special tooling like some stainless steels. Production runs might switch to CRS for higher volumes.
A: Incorporate subtle break-forming (slight bends) every 150-200mm. Even 5-10° bends dramatically increase rigidity. Also consider bead patterns or embossed ribs which add stiffness without affecting internal component space.
A: Most metals accept powder coating well, but preparation varies. Aluminum needs chromate conversion coating first. Galvanized steel requires special pretreatment. Always consult with your finisher – improper prep causes coating failure.
Implementing these professional techniques transforms enclosure design from a necessary task to a competitive advantage. Proper sheet metal enclosure design reduces manufacturing costs by 15-30%, improves product reliability, and accelerates time-to-market. The most successful engineers treat the enclosure as an integrated system component rather than just a protective box.